¶ Introduction
This instruction covers creating an audio MP3 file from MP4 video files recorded during a Sunday Service.
The finished audio file is currently used for creating audio CDs for the (few) members of the Congregation asking for them.
The source video file will have been recorded during a service, and will have over-runs at the beginning and end of the service. It may also require some editing to correct sound levels and remove unwanted sounds.
Access to a PC (personal computer) running Windows 11 applications and with reasonably fast internet connectivity will be required. The PC must be set up with internet access, the Audacity audio editing app installed, and Google Drive (filestream for use on a PC) installed and accessing the Church Google Drive files. This in turn will require a Google account activated on the PC.
¶ Importing the file into Audacity
Audacity is a relatively simple to use audio editor. Other editors can be used (e.g. Reaper) but require a relatively high level of user knowledge. The Audacity program must have the appropriate FFMPEG library installed to allow it to import MP4 video files.
Import the video file as follows:-
- Open Audacity into a new project;
- Open file/import/audio. Browse for your selected MP4 file in the dialog box and select it. A window will open showing the file being imported.
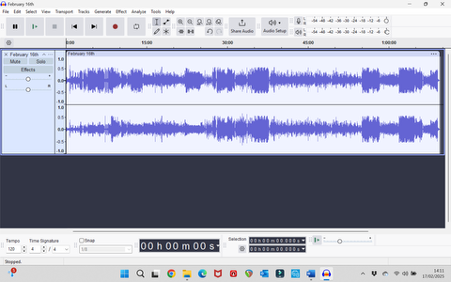
Once imported satisfactorily, the Audacity window will appear as below:
¶ Editing the file
-
Click onto the beginning of the audio and click the “play” button. You may have to go to the “Audio Setup” box to select the audio output path (headphones are recommended but not necessary).
-
Move forwards to the beginning of the service – Choir Introit or Minister’s welcome. Now select the audio from the chosen start back to the beginning of the file as shown below:-
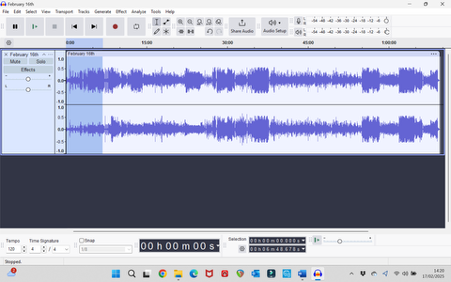
-
Use the Delete key to delete the section.
-
Use the Enlarge button (magnifying glass with + symbol) to expand the audio so that you can more clearly identify the start of the service. Repeat the selection and delete step above if there is still too much unwanted audio before the beginning. If you’ve taken off too much you can use the Undo button to go back.
-
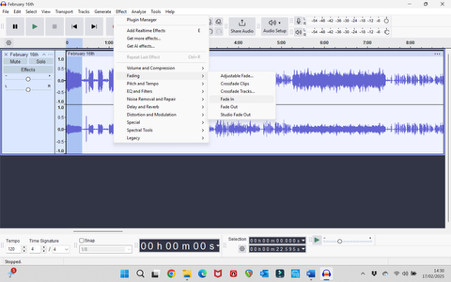
Select the audio from the start to the service start and navigate the menus Effect/Fading/Fade In and click on it to “fade in” the audio from the beginning.
-
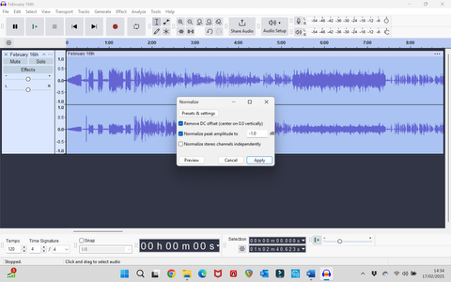
Now use keys Ctrl-A to select all the audio, and then navigate to Effect/Volume and Compression/Normalise and select. A dialog box will allow you to select the desired maximum level – adjust if required to -1dB

-
Click “Apply”. “Normalising” in this way means that all files will play back at a consistent sound level.
-
Go to the end of the file and select any unwanted audio after the end of the service. Delete it as you did for the unwanted audio at the start of the file.
-
Select a short bit of audio after the end of the service, and navigate to Effect/Fading/Fade Out, similar to the Fade In at the beginning of the service.
¶ Adjusting sections of audio volume.
Under normal circumstances, it should not be necessary to make any further adjustments to the file. However, sometimes a soft speaker is not easily audible when doing a Reading.
Audacity has powerful tools for editing and adjusting audio, which are relatively easy to learn. To adjust the volume (up or down) of a selected section of audio, do as follows:-
- Adjust the zoom in/out as necessary so that the desired bit of audio can be easily selected, and highlight the selection;
- Navigate to Effect/Volume and Compression/Amplify and select. A dialog box will appear.
- Select an amplification level. In the example, +3dB will make the selection louder, -3dB will make it quieter. You can always “undo” the change a try a different level.
¶ Exporting the edited file.
Once you’ve made all the edits and you’re happy with the results, the file has to be Exported to the Google Drive as an MP3 audio file.
Navigate to File/Export Audio. You’ll be asked (current version of Audacity) to export to Computer or to Audio.com – choose to Computer. You will now get a dialog box as shown below:-
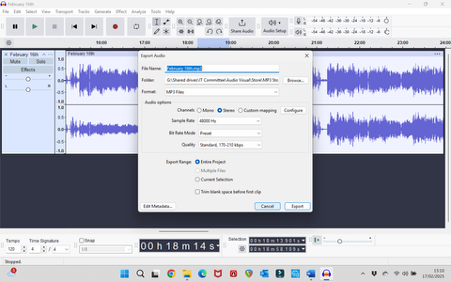
Click on “Edit Metadata” and complete the dialog box as appropriate
- Artist Name – Bishopton Parish Church
- Track Title – Date of the recording e.g. February 16th
- Album Title – Livestream services
- Track No. – 1
- Year – current Year
- Click OK
Edit the dialog box as follows:
- File name – the date of the recording
- Folder – browse to the Google Drive G:/Shared Drives/IT Committee/Audio Visual/Store/MP3 Store/Service Recordings/(current year)
- Format – MP3 Files
- Click Export.
The file should now be exported to the Google Drive as an MP3 file. Once complete, you can close down Audacity – you don’t need to save the edited file.
Depending on your upload speed, you may need to wait for the file to be uploaded fully to the Google Drive. DON’T shut down your computer until you are sure it has finished uploading!